Saturday, October 15, 2011

How to make Cider - Part 3


                Ah, before I leap into describing my rough and ready method of producing nectar from apples I must first add a couple of items that I had over looked when listing the sundry items required in part 2. The first of these is a funnel and the second is a small diameter length of tubing being of about 4mm in diameter. Again please remember to ensure that you have cleaned all items thoroughly, I do not use preservatives in this method so to avoid disappointment please clean and clean again.

Stage 1, Mulching.

                After cleaning your equipment the first stage is to prepare your hard won apples for pressing. I call this mulching, I know that it’s not the correct terminology but this is my write up and I happen to like the word mulch! Basically what we are aiming here for is to reduce the apples into mulch that can be pressed easily so releasing the apples’ juice.
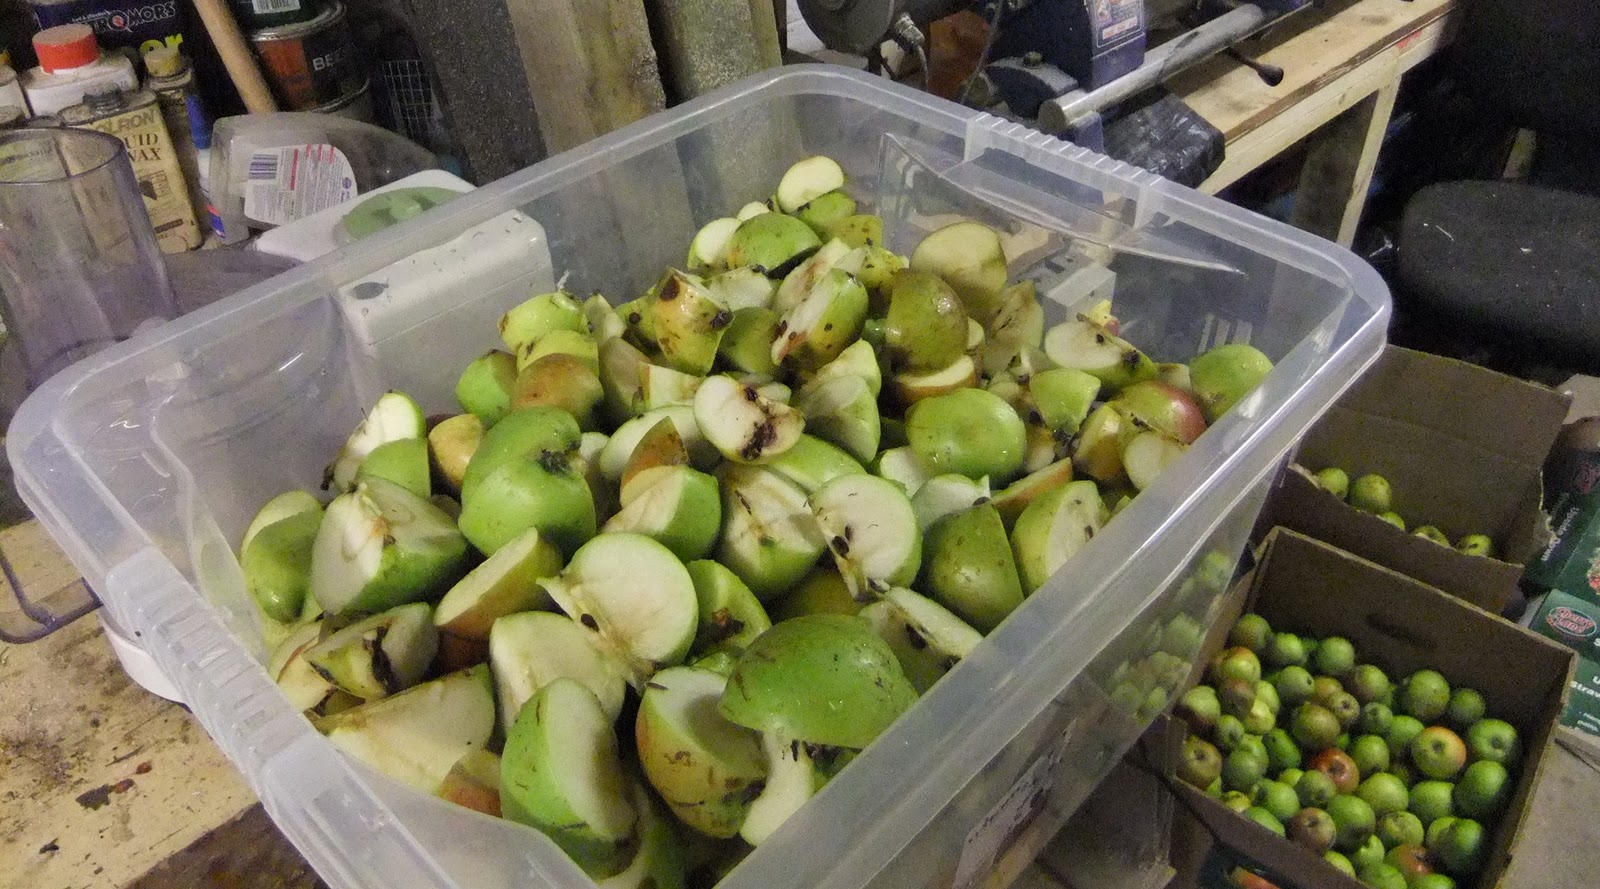
                I prefer to wash the apples simply in cold water before use; this is to remove any detritus and chemicals that may be on the outer skin of the apple. As I mentioned in part 2 this is traditionally done by first roughly segmenting the apples and then pounding them to a thick pulp with a piece of suitable timber. This works fine, but for an out of condition and rather rotund Hobbit like myself it is rather knackering. The method that I employ at the moment is to quarter the apples (6ths if large apples) and then used a food blender to reduce the apples to the desired consistency. The reason for segmenting the apples in this case is to simply allow them to be fed easily into the blender. The consistency should resemble small chucks of apples and you should not process them too much so that it resembles a paste!


Stage 2, Pressing.

                The press itself is simplicity itself consisting of few parts, which briefly are the ‘pan’ complete with threaded shaft;


                The ‘basket’, vertically slatted hardwood strips held together with metal bands (open top and bottom);


                And finally the hardwood pieces and ‘capstan’ for the applying of pressure to the mulch;


                The ‘basket’ sits on top of the ‘pan’ which in turn I position so that the lip of the ‘pan’ overhangs above a suitable container for the collection of what will hopefully be a torrent of apple juice.


                Over the collection container I stretch a course net to catch any bits of apple that escape the press. This is in turn held in place by some ancient table cloth weights.
                Once set up it is now just a simple case of loading the ‘basket’ to the top with the apple mulch. Place the two semi circular press pieces on top followed by the spacing pieces at 90 degrees. The pressure pad comes next (metal plate up) and then all that is left is to screw the ‘capstan’ down applying pressure, as the plates are forced downwards more pressure is applied by the use of a bar to turn the ‘capstan’.


                The feeling of achievement that I get when the first drops of juice make their way into the pan and then start dripping like a cold nose on a winters morning is something else (sad I know). As more pressure is applied the drip soon becomes a steady flow and my smile does tend to get a little bigger.


                Once the ‘capstan’ reaches its lowest point allow the juice to run until it basically stops. Unscrew the ‘capstan’ and remove the pressing plates, add more mulch to the top of the pressed mulch and repeat the pressing. I tend to repeat this one more time, ant more than this I find that the pressed mulch is difficult to remove from the basket. So after three pressings lift the basket and empty the ‘cake’ (the pressed mulch) into a clean container. Do not discard it just yet for if you find yourself short of a little juice some more can be obtained from repressing the ‘cake’. Repeat this ‘pressing’ process until all your apples are used or until you have obtained sufficient juice. As a rule of thumb it takes about 16 to 20lb of apples to make a gallon of juice.

Stage 3, Additives;
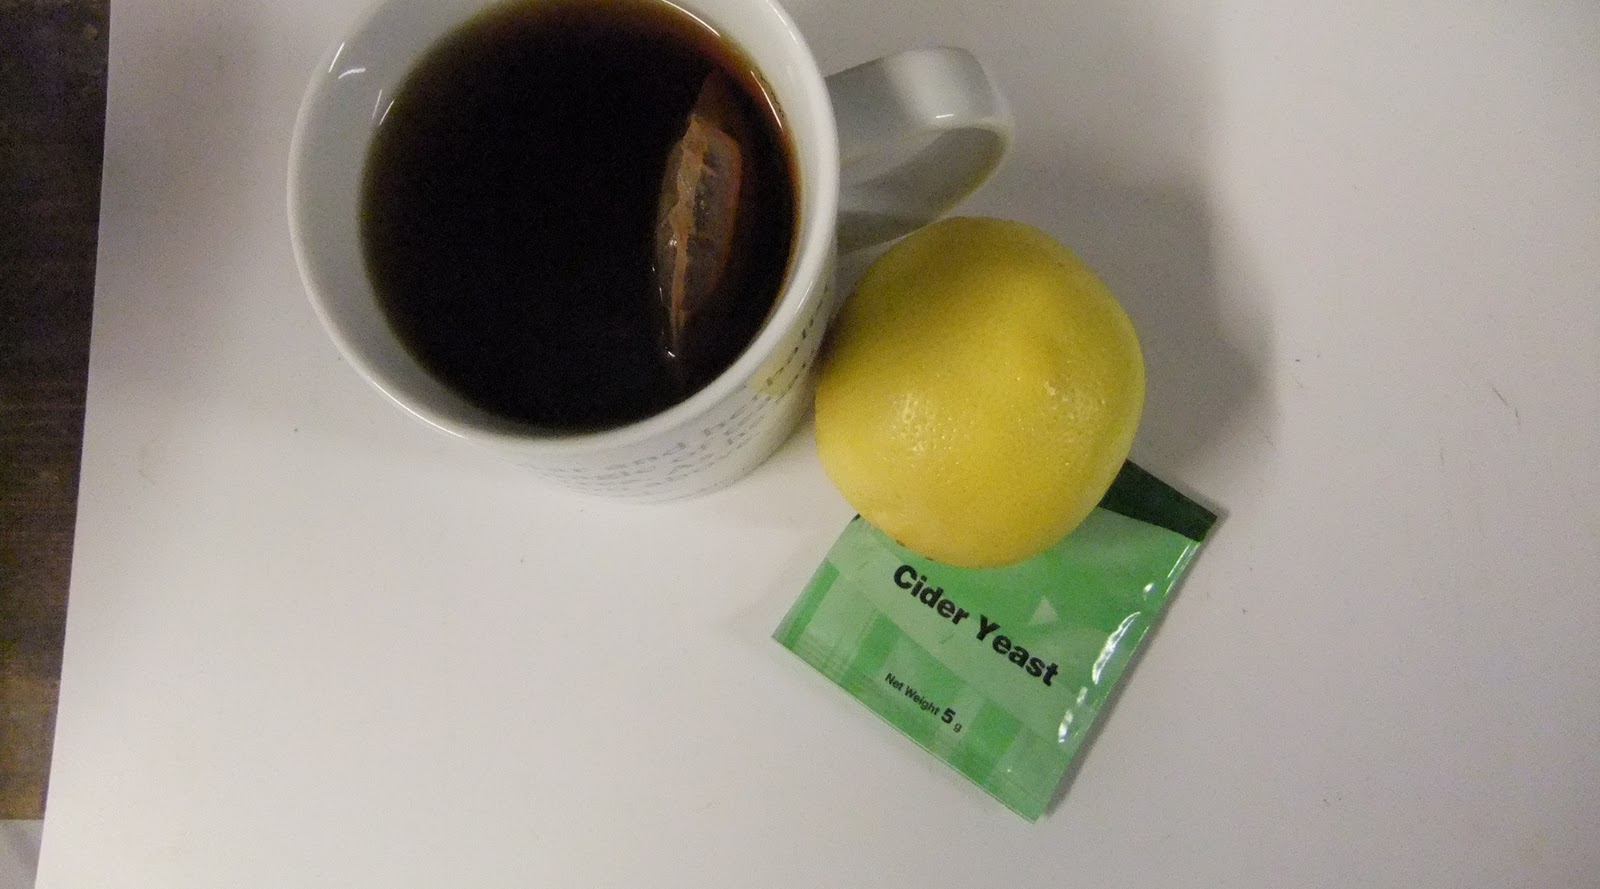

                As earlier mentioned in part 1 the ingredients used here are simple with no chemicals and the like. Once you've obtained your juice add the juice of 1 lemon to about every 3 gallons of apple juice. I must admit to a slight cheat at this point as I do not squeeze my lemons for their juice (oh err missus), but I slice sufficient lemons and add them to the blender as I’m processing the apples.
                Also to be added is a mug of cold, black tea for every couple of gallons of apple juice (about a 6th of a gallon) for tannin. Stir this in well and then add the yeast, the packet of yeast should come with manufacturers instruction upon the quantity of yeast required per gallon of juice. Allow the yeast to float on the top of the juice for about 10 minutes and then stir in.

Stage 4, Fermentation;

                You can now transfer the juice to your demy johns. What I tend to do is line the demy johns up and fill them at the same time.


                What I mean to say is that I’ll pour one jug of juice into the first demy john then move to the next and pour a jug of juice into this one. Moving along the demy johns this way means I get an even ‘mixture’ of the juice into each one as I find that the yeast does have a tendency to drop to the bottom of the juice even with stirring. I stir the juice after each round of jug pouring and repeat this until the demy johns are filled to just above their shoulder. It’s at this point if you find that you have miscalculated your quantity of juice and are a little short that the ‘cake’ can be repressed to obtain more juice. It does take more effort the second time of pressing but it is better than being short of juice.
                The demy johns can now be closed off using a rubber bung with a hole through it and air lock assembly. At this point it may be worth noting that I do not just put water into the airlock but water that has been boiled and allowed to cool. Another point is that I cover the open top of the airlock with lint free cloth, held by cotton or an elastic band to prevent detritus or insects entering the airlock. All being well by the next morning you should have the satisfaction of seeing your airlock releasing bubbles of gas from the demy john. During the natural process of the yeast consuming the sugar within the apple juice it produces two waste products; alcohol and carbon dioxide, this is the gas you see bubbling through the air lock.
                The time for which the juice continues to ferment can depend upon a few factors; amount of natural sugar in the juice, temperature, amount and strain of yeast etc. This may take from two to several weeks. As the juice ferments the appearance will change from that of something that may have been expelled from an effluent plant to a clearing and pleasing golden colour.
                As this happens keep an eye on the fluid in the air lock and the rate of bubbles passing through it. As the rate slows to a hardly discernable flow or stops completely it is now the time that I bottle the juice.

Stage 5, Bottling;

                Bottling is straight forward enough and I just siphon off from the demy john to the bottles. I personally do not rack demy johns off from one to another to help clear the sediment formed during the fermentation process. It’s not because I’m lazy, well not just because, but I prefer to leave the juice well alone and reduce the risk of contaminating it by say dirt off my hand. This does leave sediment at the base of the vessel so care has to be taken not to use a tube of too great of a diameter, hence keeping the flow rate slow and also keep the tube a little above the sediment.


 At this point there is a choice to be made about your end product in that you can have flat cider, preferred by some or, like myself, carbonated cider (cider with fizz n bubbles). This again is simple enough as if flat cider is required then the juice can be siphoned directly into your bottles. If carbonated is required then add a level tea spoon of sugar (caster sugar dissolves faster) into each litre bottle before filling. For this I use a dry funnel so as to avoid getting sugar around the bottle’s top or neck. The adding of this sugar achieves carbonation simple by giving the remaining yeast a small amount of sugar to feast upon producing some more alcohol but more importantly now some more carbon dioxide. Because the bottle is now sealed the gas produced cannot escape and the pressure increase forces the gas to be absorbed into the liquid to be released once you open your bottle of cider with a satisfying ‘pop’.
                If all goes well your cider will be drinkable in 6 months (a tad earlier if you really cannot wait) but I left mine for 10 months after bottling. A word of caution though, because of the lack of any preservatives in this method it is not wise to leave it anymore than about 12 months after bottling with it then being at risk of ‘going off’. This method, for me, produced an extremely drinkable, dry, cider which without being biased I preferred to many of the shop bought labels. I like it chilled from the fridge and it did have quite a kick, enough to redden my face a tad after a glass or two. Any who sampled it drained their glass holding it up for more and I simply could not ask for a better endorsement than that.
                So there we have it, cider the Murphyfish way. If you have any questions or points of improvement to put across please feel free to comment. I know that to some of you this seems a rough and ready way to produce cider and the purest may well be now a wailing and gnashing their teeth, but it is, like me, rugged, simple and honest. Funny, it is hard to believe that a grease monkey like me can turn effluent into this;


As tradition dictated my last bottle from last year was drank as I crushed the first of this year’s apples, simple but strangely rewarding for me. I hope that you’ve enjoyed this straying from my usual meanderings, and ‘till the next time take good care of you and yours my friends.
John

Thursday, October 13, 2011

How to make Cider - Part 2


The Equipment required;
      Just as the ingredients mentioned in part one are straight forward and simple enough, it just so happens that so is the equipment required, well at least the equipment that I use is!
Containers; 

      A selection of containers will be required for tasks such as washing the apples, a place to keep sliced apples, to hold the pressed juice etc. For all containers I strongly urge the use of stainless steel or food safe plastic to avoid issues such as contamination, affecting the taste via leaching amongst others. All containers must be clean, and I do mean clean! The biggest lesson that I learnt from least year’s cider making was that it is a lot of wasted effort if you loose a couple of gallons of cider by not ensuring that everything is clean.
Masher or pulper; 


     Last year saw Chunky Monkey and me laboring with a piece of 3x2 wood, pulverizing the apples in a plastic container. 


      Although effective the process soon had us both knackered and several ‘recuperation’ breaks were required by both. So for this year’s production I was looking for an easier way to reduce the apples into a state into which they could be pressed, especially as I had been abandoned by the Chunkster due to work commitments with his fledgling company. For a brief trail last year I sneaked Clare's food blender into that hallowed space known as the garage and very effective it proved in reducing the apples into the right consistency for pressing. Unfortunately my experiment was cut short when my plan was uncovered (luckily for me it was the only thing cut short!). This year though I have obtained a second, all singing and dancing blender from a recent car boot sale for the princely sum of £2.00. This I graciously gave to Clare who in turn allowed me to claim the original blender. So for this year a blender was the weapon of choice for mashing the apples. Again you must insure that the item is clean before use, and I do not mean a quick rinse under the tap.
The press; 
 
        The press above was obtained last year by the Chunkster and myself for around £50.00 each. This was by far the greatest expense of the operation but once obtained a well made press should last for years if properly maintained. The idea of the press is relatively simple; apple mulch is loaded into the top and is pressed down using the wooden plates via the threaded bar and capstan piece. As the wood is forced onto the mulch the resulting pressure forces the juice through the vertical slates to be collected in the drip tray and then into a suitable container.
Storage bottles; 

       For the initial fermentation stage I use traditional demy johns fitted with pressure releasing air locks. For the bottling stage I prefer the ceramic topped bottles where the top is held in place by a strong ‘spring’ and the seal between glass and ceramic is obtained via a rubber seal.

Sundries; 

       As well as the above there are a few items which make life that little bit easier; a couple of sharp knives, food safe chopping board, flexible spatula, food safe lubricant, anti bacterial cleaning spray, an understanding wife, a transfer jug, lint free clothes, mesh bag, stirring spoon (a big un)and finally a CD player with a varied selection of your favorite music as the process can be quite time consuming. I would venture that early ZZ Top, Fleetwood Mac, Rye Cooder, Steve Earl and perhaps a little of the Wurzels are suitable accompaniment whilst laboring over your apples.
Cleaning solutions; 

          At the risk of repeating myself I cannot stress strongly enough how important I feel that keeping everything, even your hands, as clean as possible is. 
       Before use I wash or soak every piece of equipment mentioned in the above paragraphs in a solution more commonly used for the cleaning of baby drinking/feeding containers before allowing it to air dry. There are of course recognized brands available but I stick with the cheaper supermarket own brands to save a few pennies and they do the job just as well. As well as this I invest in a decent anti bacterial cleaning spray which I constantly use to wipe down various items and surfaces throughout the process. Perhaps you may think that this is a little over the top but believe me when I say that the dejection felt after all the work required to produce a couple of gallons of apple juice is all for naught just because of not paying a little time and attention to cleanliness is not a good feeling at all – the term ‘well pissed off’ certainly comes to mind!
Well I think that covers the equipment required and so ends part two of this here Hobbit’s feeble attempt to explain how I make cider. If you’ve got this far then I haven’t done a bad job so far. The third and final installment will follow soon and is the best bit, being the actual cider making process.
‘Till the next time take good care of your selves, 
Your friend, John

Wednesday, October 12, 2011

How to make Cider - Part 1

                After a couple of requests from some of my readers from across the pond I feel compelled to give my take upon the ancient and dark art of cider making. Now regular readers will know that I'm as about as expert on this subject as I am on say; lobotomy operations, the art of chess or even writing for that matter! So for me to try and produce a readable, practical guide to making cider using ‘The Murphyfish method’ should be interesting to say the least! I’ll endeavour to make this as plain and as simple as possible, although from me you would expect nothing else! Having said this though, the very beauty of the method that I’ve put together from various sources and other peoples accounts is in its simplicity.
A lot of the recipes and methods that I came across talk in much more detail, using chemicals and some more natural bits n bobs to produce cider comparable to shop bought. But I’m a simple man and when myself and my friend Chunky Monkey set about making cider last year we decided to forgo a lot of the science and plumb for the simplest method that would result in a drinkable and alcoholic brew. The results were firstly a great deal of fun and laughter in the making of it, a lot of expectation and of staring at bubbling glass jars and finally a brew that proved to be far more enjoyable than we could have ever hoped! Every person that sampled the stuff finished their glass and held it up for more. This, more than anything, says that the method that we cobbled together between us worked fine enough for these two bumpkins!
                
The Ingredients;


                Apples;-  Yes apples, now I know some you might well be thinking ‘well that’s bloody obvious’ but before you start smirking and wallowing within your smugness, a word. Several cider recipes that I perused last year in an effort to gain an insight into this dark art named specific types of apples that were “absolutely essential” in the production of drinkable cider – hogwash. There may well be truth in that certain apples encourage certain qualities within the finish product but if, like me, you do not have access to such fruit and like me, which is more than likely the case, your apple identification runs to Crab apples, Cooking apples and then other apples well then worrying about specific types of what apples to use is pointless.
One thing that I gleaned from the abundance of material out there on the subject is that the more diverse a mixture of apples you use, of whatever types you can lay your clammy hands upon, the better. But words of warning, try a least to make some sort of record from whence you obtained your different apples and in what quantities they were roughly mixed. The reasoning behind this is if, like me, you manage to produce an acceptable and palatable cider then it’s wise to have a record or recipe if you like, of what made it successful.
Apples should be picked when ripe or as near as damn it with any bruised of rotten ones discarded. After picking I tend to store my apples for a week or so in cardboard boxes again discarding ones that appear to be rotting. It’s at this point that the inner sanctum known as the garage begins to smell like an orchard.
One final word (for now) is that you’ll require around about 20lb’s of apple to produce 1 gallon of cider. This is because there is no water used in my method so all the liquid comes from the fruit. So be aware that if you decide to produce more than just a couple of bottles then a large quantity of apples will be required.

Yeast; - But more specifically cider yeast. Now do not expect this befuddled hobbit to know the ins and outs of yeasts but apparently different types will give different results in the fermentation process, hence cider yeast is the one for me. From the little that I’ve learned so far, yeast is a fungus (I think) with several different species/varieties that consume the apples’ sugar at different rates so giving different quantities of waste off in the forms of carbon dioxide and alcohol, hence the different effects upon the end product.
It is possible so ferment cider using only the natural yeast that is found on the apples but I felt that was a little bit of ‘leaving it to chance’, hence the addition of the ‘produced’ yeast. After all it’s a lot of apples and effort to waste if it all goes tits up!

Lemons; - I add about 1 full lemon to each one of my production sessions which is about 3 gallons at the moment. This is added to introduce some acidity and seems to help the process along. Like I said I’m no expert and I do not know exactly why this works, but it does.

Strong cold tea; - This helps provide or increase ‘tannin’ in the cider. The best way that I can explain tannin and it’s need in cider production is by being lazy and giving you this link to follow; http://www.cider.org.uk/tannin.htm. Yes I know it’s a small cop out but I didn’t want to cheat and pretend that I know all the ins and outs of this part of the process.

And that’s it, just four ingredients! Well that's part one done and dusted, part two will give a run down on the equipment used and the method of turning apples into something a little bit special. I hope that this is making sense so far.

Your friend,
John


Friday, October 7, 2011

Out and about..........

      Afternoon all, and a wet and windy one it is at that here in 'sunny' Buckley. It came to mind that recently I've allowing a few things slip lately and that ol' devil lethargy and his side kick Mr. Morose have been sneaking up on me, rather like mosses slowly covering a stone - at first you don't notice it but if you're not careful they'll completely swamp you and you'll not see the truth lying underneath. 


      It's certainly not that I haven't been active but the pressure of 'the grind' has been heavy upon me and there just never seem to be enough hours in the day to finish everything, so in the end you end up like the Irish man who was put in a barrel and told to piss in the corner - very dizzy and still with the pain of a full bladder!


      Fortunately I know of a remedy to these woes, a walk in the woods on a crisp autumnal morning - and I do mean crisp! We headed back to Nercwys woods, a place we have not been since the Warthog cut here hock a while ago. As soon as we set foot upon the trails we fell into our routine, Willow investigating anything up to twenty yards ahead and this here Hobbit once again having his breath taken away by nature.


     The walled area where pigs were kept awhile ago now homes a small flock of old breed sheep, and they fitted perfectly within their new surroundings.


       All along the trails were signs that autumn has final taken over from summer after the recent mini heat wave that caressed us and teased that it would be warm for a few more weeks to come. I'm one for defined seasons so so finally have autumn weather here is a blessed relief for me at least. There's not many words this clumsy bugger could use to describe the joy of the walk and the relief that it gave from what was beginning to feel like a deepening gloom taking hold. Suffice to say I'll let me quickly taken pictures share some of the walk with you;


 So there we have, few words but a bloody lovely walk that rid my blues afore they even had chance to take a hold of me. Hope that you enjoy this little meander of mine, and for a tease my next post will be serious one upon cider making!


Till then take good care my friends,


John

Friday, September 30, 2011

Goodbye to the chickens...

        OK so that's another one of my misleading post titles, what it really should say is 'Goodbye to the chicken's house, Poultry Towers'. But hey if it grabbed your attention then mission accomplished me thinks.


       But yes today was the day when 'Poultry towers' ceased to be. The obvious and most labor saving method would have been fire me thinks, and after today's pantomime I'm beginning to think that would have been a good choice. Firstly I should explain the reasons behind the ending of said chicken coup, remember that we started with just two cute n cuddly bantams (with a hint of loveliness)? then one of the buggers went all broody, and then my friend (?) Mr. J. Grey cajoled me into taking six fertilized eggs and then all the buggers only went and hatched (damn Penny for being such a good mum)? OK so one sadly didn't make it but the other five mini dinosaurs have positively thrived and now require larger accommodation - bugger. Mini dinosaurs you ask? bloody right they are, have you ever seen the veloceraptors in Jurassic park? could have been my chickens I'm telling you straight!


      So back on tangent it was decided to donate Poultry Towers to a deserving cause, and what better cause than the bugger who finally got me hooked on chickens, especially as he's suffering from a case of the worst illness known to mankind - yep man flu.


    Having carefully deconstructed said creation to enable easy (ha)  reassemble   it was then loaded into the Fun Cruiser and trailer (yep that big) and off we set. At this point I should just perhaps mention a couple of things about my trailer: firstly it's old - me and my dad made it when I was 12 ish, secondly its number plate does not exactly match mine (OK it does not look anything like mine), and finally I don't plug the lights in because they blow me brake lights. Yes I know as a engineer I should fix this but do you know of a green keeper who likes gardening? Damn thing is though it's about 15 miles to John's abode for chickens and other fowl and I swear to god that in that short journey I have never ever seen so many bloody policemen sitting in their jam butty cars, talk about a fraught journey! Needless to say tomorrow I'll be working on the trailer repairs, bugger.


      Once the Beverly hill billies (that'll be us and our trailer) safely descended on John it was quickly apparent that he wasn't at deaths door after all and was able to provide a hot brew and plenty of moral support and chicken advice as I manfully struggle to erect my temple to chickens.


      After a brief construction process Poultry Towers was finally relocated in its new home, I'm sure that it'll give plenty of future chickens a safe haven, especially with John looking after them.


     Oh and another thing just crossed my mind, you know how I damn well struggle to take furry animal pictures when upon the trials? Well ha, no I think a double is required here so Ha ha mortals. For your perusal a selection of photographed animals from John G's menagerie ;-


       OK so I didn't take the feathered ones, or the cave man in the earlier photo by Poultry Towers, but the pig ones? mine all mine I tell ya. 


      Oh and what of my own, coup-less chickens? fear not dear reader for I can take great pleasure in unveiling;-


Fluttering Heights - ta daaaa


Right that's enough bunkum for one post, as always thank you for reading and until the next time take good care.


Your friend, John